


Installing Windows 7 - Step by step
Boot from Windows 7 DVD
The first step is to place your Windows 7 DVD into the DVD tray and boot the machine. Your computer needs to be configured to boot from DVD. This is done via BIOS. On most computers, the BIOS menu can be accessed by pressing either the F2 or Del keys while the machine is booting.

Once you have completed this stage, Windows 7 will start loading. If you see the below image, you're doing well so far.

After a few moments, you will reach the installation menu. Your first step is to choose the language and the keyboard.

You will be now taken to the Install now menu. We have already prepared for the installation, so you can click Install now and proceed.

The next step is to accept the license agreement.

After this, you will have to decide whether you want to Upgrade an existing installation or perform a Custom (advanced) installation, which is basically creating a new copy of Windows.
We will discuss multiple boots in a separate tutorial. For now, if you are interested, you may want to explore a Dual boot tutorial that tackles this issue from the Linux side, with a Linux distribution being installed alongside Windows XP. In the soon-to-come multiple-boot tutorial, I will address the installation of Windows 7 alongside other Windows (XP and 7), as well as Linux.
Personally, I recommend you install a new copy. Fresh installations are always better. Your machine starts in a pristine state and does not rely on old leftovers.

Partitioning
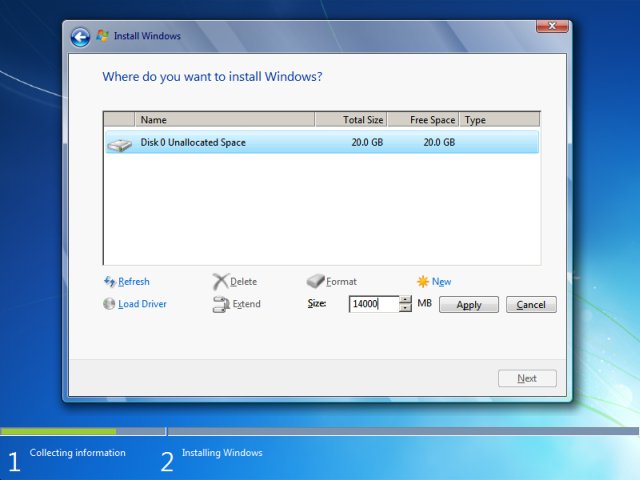
The next step is to choose where you want to install Windows 7. This is probably the most important part of the entire installation, so you need to be very careful here and make the right choices.

We only have a 20GB unallocated space on our disk, so we have no dilemma. However, it is possible that you may have other partitions from previous installations present, or you may have created a custom partitioning setup before starting Windows 7 installation using a third-party partitioning software, like GParted. We will soon this discuss in greater detail. For now, let us create our Windows 7 partitions.
Inexperienced users can simply highlight the unallocated space and click Next. The partitioning layout will be created for them. However, we want to explore additional features. To this end, we need to expand the Drive options (advanced).

You now have the option to create new partitions, format them with a desired filesystem, change the size of existing or newly created partition (Extend), or delete them. The Load Driver function is usually necessary if you want to create more complex setups like RAID, but this is currently beyond the scope of this tutorial.
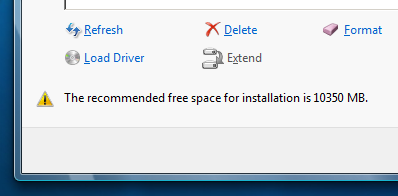
We will create a new partition. According to official system requirements, Windows 7 needs 16GB of free space. However, you can do with less. The minimum recommended space for a partition where you want to place Windows 7 is 10350MB. Eventually, the installation itself will take approx. 7GB.
Just for your information, here's a snippet of what would happen if you try to install Windows 7 on a partition that does not meet the minimum expected size limit:
This does not mean your installation won't succeed. It might, but why risk it?
We will create a 14GB partition:
Windows 7 installer will now tell you that it will have to create an additional partition for the core system files. This will be a small primary partition ahead of your newly created one.

This is what it looks like:

Important technical bits to pay attention to!
We now have a system partition and a primary partition, plus some free space. In purely technical terms, there is no such thing as a partition of the type system. There are only two types of partitions: primary and logical. The above-mentioned partition is a primary partition.
In total, there can only be up to four primary partitions on any physical disk. Windows 7, by itself, creates and uses at least two primary partitions. If we created another partition in the free space, it would too, become a primary partition.
Some quick math, this means that if we want to have more than two Windows 7 installations side by side, we don't have enough partitions available.
Recommendation:
Use a third-party partitioning tool to create a partition layout beforehand. This will allow you to place Windows 7 files on a logical partition, saving yourself the precious commodity of wasting primary partitions on what is essentially non-system data. We will see this example in a separate tutorial.
If you're using ONLY Windows 7 to create a partition layout on your system, then you should just create a partition with a sufficient size to hold the Windows 7 data files and nothing else. The system partition will be added. Leave the handling of any unpartitioned, free space after the installation.
Begin installation
If you're comfortable with your setup, highlight the created partition and click Next. Windows 7 will be installed to this partition. Depending on your hardware, this can take some time. My testing shows approx. 30-40 minutes.

During the installation, your computer may restart several times. Let it be.
User settings
Eventually, you will be asked to provide your username and a computer name. You will also have to password-protect your account. This is most advisable. You should opt for a strong password.


Activation
The next step is to activate your Windows. Grab your key and type it here.

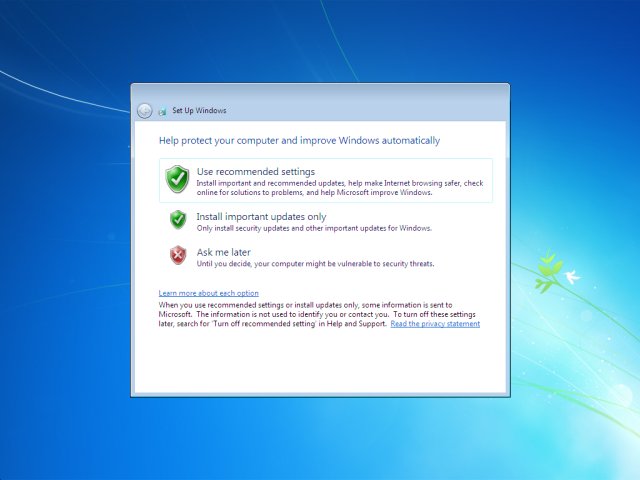
Updates
You will be asked to configure your updates. You can choose either setting you like. However, I recommend you configure this choice later, after Windows 7 is installed and running properly.
We will discuss this separately in the Windows 7 security tutorial. Therefore, I will chooseAsk me later, but you may want to go for either the first or the second option, as you see fit.
Time zone
Configure your time zone:

Location
Your location will determine the firewall settings for your newly installed Windows 7. You have three choices: home, work or public network. Home and work networks are supposed to be trusted, so you should not experience any problems adding other machines to your group or sharing data with them.
However, the public network is meant to be untrusted. So if you have installed Windows 7 in, let's say, Internet cafe, then you should choose the third option.

Congratulations!
Congratulations, you have just successfully installed Windows 7.


