الفرق بين الفيروسات المختلفة


جميع مستخدمى الكمبيوتر يعرفون الفيروسات، حيث يكون تعرض معظمهم إلى الإصابة بأحد هذه الفيروسات، إلا أن الأقلية منهم هى من تعلم نوعية وطبيعة الفيروس المصابة به، حيث يفيد معرفة نوع الفيروس فى معرفة الطريقة المناسبة للقضاء عليه، ويقول تقنى الكمبيوتر" محمد أنور" أن جميع مستخدمى الكمبيوتر قد يتعرضون للإصابة بالفيروسات المختلفة مثلWorm , Trojan, وRootkit، إلا أن الكثير من المستخدمين يجهلون الفرق بين هذه الأنواع، حيث تنقسم البرامج الخبيثة إلى برامج فيروسات وبرامج تجسس.
وأضاف "انور" أن البرامج الخبيثة تكون عبارة عن أى فيرس يقوم بتدمير جهاز الكمبيوتر، أما برامج التجسس فهى برمجيات يتم تثبيتها دون علم مستخدم الكمبيوتر وتقوم بنقل المعلومات الأساسية والبيانات الحساسة إلى المخترق الذى يرغب فى اختراق جهاز الكمبيوتر، مشيرا إلى أن الفيروسات هى عبارة عن برنامج صغير يقوم بنسخ نفسه تلقائيا بين الأجهزة المختلفة لكنه يحتاج إلى السيطرة على ملف .exe والذى يقوم بإتلافها، وعند تشغيل هذا الملف يقوم الفيروس بالانتشار داخل الجهاز.
وأوضح "أنور" أن فيرس Trojan أو كما يسميه البعض" حصان طروادة" لا ينسخ نفسه على الكمبيوتر ولكنه يقوم بتثبيت نفسه على جهاز الكمبيوتر كأنه برنامج عادى جدا، وبمجرد تثبيته يستطيع المخترق أن يقوم باختراق الجهاز المصاب بكل بساطة عن طريق شبكة الانترنت.
أما "worms"أو الدودة فهى تشبه الفيروسات إلا أنها يمكنها أن تنسخ نفسها بنفسها مرة أخرى، فهى لا تحتاج إلى ملف .exe للقيام بهذا الأمر، حيث تستخدم شبكة الانترنت لعمل ذلك، فتقوم بنسخ نفسها بعدد كبير جدا على جهاز الكمبيوتر مما يجعلها تستحوذ على كل مساحته، وتقوم بتقليل سرعة الكمبيوتر وسرعة الاتصال بالإنترنت، كما قد تقوم أيضا بإرسال رسائل بريد إلكترونى محتوية على نسخة من الفيروس إلى جهات الاتصال لدى المستخدم بصورة أوتوماتيكية دون أدنى تحكم منه، كما تساعد مبرمجها على اختراق الجهاز المصاب، والسماح له بالدخول فيه، لذلك يفضل تحديث نظام التشغيل بصورة دورية وتحديث برنامج مكافحة الفيروسات.
وأضاف" أنور" أن Rootkit تعتبر من أصعب أنواع البرمجيات حيث تقوم دائما بالاختفاء مما يصعب على المستخدم العثور عليها أو حتى برامج مكافحة الفيروسات التى تجبرها على قراءتها على أنها برنامج عادى غير ضار بالكمبيوتر ،والتى قد تدخل إلى جهاز الكمبيوتر وتثبت نفسها عندما يقوم المستخدم بتثبيت نظام تشغيل من أسطوانة غير موثوقة المصدر تكون مصابة بنفس هذا النوع من البرمجيات الخبيثة، وهى تقوم بحذف البرامج المثبتة على نظام التشغيل وتمنع تثبيت برامج جديدة، فمثلا قد تحذف برنامج مكافحة الفيروسات وتمنع تثبيته مرة أخري، مشيرا إلى أن أفضل حل مع هذه النوعيات من البرامج الخبيثة هو إزالة نظام التشغيل وتثبيت آخر جديد، ثم القيام بعمل فحص للجهاز مباشرة، قبل تثبيت أى برامج أخرى.
http://www.cairodar.com/news/details/55371

What is Swap Space?

 1 What is Swap Space?
·         2 Recommended Swap Space for CentOS 6
·         3 Identifying Current Swap Space Usage
·         4 Adding a Swap File to a CentOS 6 System
·         5 Adding Swap to a CentOS 6 LVM Swap Volume
·         6 Adding Swap Space to the Volume Group
Computer systems have a finite amount of physical memory that is made available to the operating system. When the operating system begins to approach the limit of the available memory it frees up space by writing memory pages to disk. When any of those pages are required by the operating system they are subsequently read back into memory. The area of the disk allocated for this task is referred to as swap space.
Recommended Swap Space for CentOS 6
The amount of swap recommended for CentOS 6 depends on a number of factors including the amount of memory in the system and the workload imposed on that memory. The current guidelines for CentOS 6 swap space are as follows:
§  4GB of RAM requires a minimum of 2GB of swap space
§  4GB to 16GB RAM requires a minimum of 4GB of swap space
§  16GB to 64GB of RAM requires a minimum of 8GB of swap space
§  64GB to 256GB of RAM requires a minimum of 16GB of swap space
Identifying Current Swap Space Usage
The current amount of swap used by a CentOS 6 system may be identified in a number of ways. One option is to cat the /proc/swaps file:
# cat /proc/swaps
Filename     Type            Size    Used    Priority
/dev/dm-1    partition       2064376 0       -1
Alternatively, use the swapon command:
Filename     Type            Size    Used    Priority
/dev/dm-1    partition       2064376 0       -1
Finally, the free command may also be used:
# free
             total       used       free     shared    buffers     cached
Mem:       1021488     615348     406140          0     199596     160312
-/+ buffers/cache:     255440     766048
Swap:      2064376          0    2064376
Adding a Swap File to a CentOS 6 System
Additional swap may be added to the system by creating a file and assigning it as swap. Begin by creating the swap file using the dd command (the size can be changed by adjusting the count= variable; the following creates a 131MB file):
# dd if=/dev/zero of=/newswap bs=1024 count=128000
128000+0 records in
128000+0 records out
131072000 bytes (131 MB) copied, 1.7639 seconds, 74.3 MB/s
Configure the file as swap:
# mkswap /newswap
mkswap: /newswap: warning: don't erase bootbits sectors
        on whole disk. Use -f to force.
Setting up swapspace version 1, size = 127996 KiB
no label, UUID=91588fb6-ac01-47f6-bb42-064c1c7c4599
Add the swap file to the system in real-time:
# swapon /newswap
Finally, modify the /etc/fstab file to automatically add the new swap at system boot time by adding the following line:
/newswap    swap    swap   defaults 0 0
Adding Swap to a CentOS 6 LVM Swap Volume
By default, CentOS 6 configures swap space using Logical Volume Management (LVM). An alternative to adding swap via file, therefore, is to extend the logical volume used for the swap.
The first step is to identify the current amount of swap available and the volume group and logical volume used for the swap space (for more information on LVM, refer to the chapter entitled Adding a New Disk to a CentOS 6 Volume Group and Logical Volume):
# lvdisplay
  --- Logical volume ---
  LV Name                /dev/vg_centos6/lv_root
  VG Name                vg_centos6
  LV UUID                nU70n0-scyi-xp2S-1CNq-GUa1-4Vad-gQKIOO
  LV Write Access        read/write
  LV Status              available
  # open                 1
  LV Size                23.54 GiB
  Current LE             6026
  Segments               2
  Allocation             inherit
  Read ahead sectors     auto
  - currently set to     256
  Block device           253:0

  --- Logical volume ---
  LV Name                /dev/vg_centos6/lv_swap
  VG Name                vg_centos6
  LV UUID                5uVonb-SCk2-bedt-4Oj3-LGpq-TpsA-qyCGEl
  LV Write Access        read/write
  LV Status              available
  # open                 1
  LV Size                1.97 GiB
  Current LE             504
  Segments               1
  Allocation             inherit
  Read ahead sectors     auto
  - currently set to     256
  Block device           253:1
Clearly the swap resides on logical volume lv_swap which in part of volume group vg_CentOS6. The next step is to verify if there is any space available on the volume group that can be allocated to swap volume:
# vgs
  VG       #PV #LV #SN Attr   VSize  VFree
  vg_centos6   2   2   0 wz--n- 47.50g 22.00g
If the amount of space available is sufficient to meet additional swap requirements, turn off the swap and extend the swap logical volume to use the additional space:
# swapoff /dev/vg_centos6/lv_swap
# lvextend -L +3GB /dev/vg_CentOS6/lv_swap
  Extending logical volume lv_swap to 4.97 GiB
  Logical volume lv_swap successfully resized
Next, reformat the swap volume and turn the swap back on:
# mkswap /dev/vg_centos6/lv_swap
mkswap: /dev/vg_centos6/lv_swap: warning: don't erase bootbits sectors
        on whole disk. Use -f to force.
Setting up swapspace version 1, size = 5210108 KiB
no label, UUID=acd810b6-6522-43c8-b16d-a3f365288b15

# swapon /dev/vg_centos6/lv_swap
Having made the changes, check that the swap space as increased:
# swapon -s
Filename      Type            Size    Used    Priority
/dev/dm-1     partition       5210104 0       -1
Adding Swap Space to the Volume Group
In the above section we extended the swap logical volume to use space that was already available in the volume group. If no space is available in the volume group then it will need to be added before the swap can be extended. Begin by checking the status of the volume group:
# vgs
  VG           #PV #LV #SN Attr   VSize VFree
  vg_centos6       1   2   0 wz--n- 8.79g    0
The above output indicates that no space is available within the volume group. Suppose, however, that we have a requirement to add 2GB to the swap on the system. Clearly, this will require the addition of more space to the volume group. For the purposes of this example it will be assumed that a disk partition that is 2GB is size and represented by /dev/sdb is available for addition to the volume group. The first step is to turn this partition into a physical volume:
# pvcreate /dev/sdb
  Physical volume "/dev/sdb" successfully created
Next, the volume group needs to be extended to use this additional physical volume:
# vgextend vg_centos6 /dev/sdb
    Volume group "vg_CentOS6" successfully extended
At this point the vgs command should report the addition of the 2GB of space to the volume group:
# vgs
  VG           #PV #LV #SN Attr   VSize  VFree
  vg_centos6       2   2   0 wz--n- 10.78g 2.00g
Now that the additional space is available in the volume group, the swap logical volume may be extended to utilize the space. First, turn off the swap:
# swapoff /dev/vg_centos6/lv_swap
Next, extend the logical volume to use the new space:
# lvextend -L+2GB /dev/vg_centos6/lv_swap
  Extending logical volume lv_swap to 3.97 GiB
Re-create the swap on the logical volume:
#  mkswap /dev/vg_centos6/lv_swap
mkswap: /dev/vg_centos6/lv_swap: warning: don't erase bootbits sectors
        on whole disk. Use -f to force.
Setting up swapspace version 1, size = 2064380 KiB
no label, UUID=1bb0e260-7940-4070-929c-91518a7be384
Next, turn swap back on:
# swapon /dev/vg_centos6/lv_swap
Finally, use the swapon –s command to verify the addition of the swap space to the system:
# swapon -s
Filename       Type            Size    Used    Priority
/dev/dm-1      partition       2064376 0       -1


Configure Mikrotik as a Hotspot Server


 mikrotik as hotspot
There are many posts on how to configure Mikrotik as hotspot. But I am sure this is not the result of a cheat sheet. Even if some of section are the same, it was fate. Mikrotik is a friendly operation system, and is very easy to configured. Enough to know the concept of network, plus with a Winbox, then you will easily configure the Mikrotik, in accordance with your wishes. I configured wireless outdoor of mikrotik, as a hotspot. I forget the type of the mikrotik. It's been a long time. And now for the post on this blog, I configure the mikrotik hotspot again, but this time, the mikrotik is installed inside vmware.
Let’s begin.

Setup IP Address Ethernet.
In my case, the Mikrotik to connect to the internet, simply by setting IP address dhcp. Open winbox, Click IP – DHCP Client. In the open dialog box, click plus (+)
winbox mikrotik - dhcp client

The new Open dialog box will be appear again, like below. Select ether1 interface, and check peer dns, ntp peer and the default route. Then click Ok.
winbox mikrotik - new dhcp client

Click new Terminal.  Make sure Mikrotik connect to internet. Use command ping.  Look at picture below.
winbox mikrotik - new terminal

Setting DNS
Click IP – DNS. In the open dialog box, click Settings. New open dialog will be appear. Input IP DNS in the box Servers, for example 8.8.8.8.  and check Allow Remote Requests. Then click OK.
winbox mikrotik - dns settings

Setting NTP (Network Time Protocol)
Click System – NTP Client. Continue to check enable and select Unicast mode, and then input IP address for Primary NTP Server & Secondary NTP Server, as shown below. Then click OK.
winbox mikrotik - setting ntp client

Setting Mikrotik Hotspot
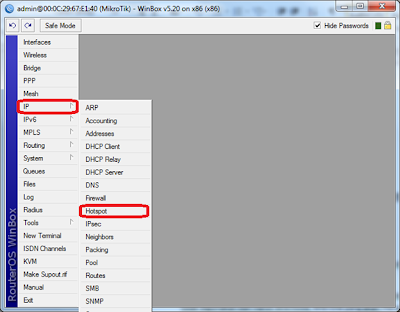
Continue to setting Hotspot. Click IP – Hotspot
winbox mikrotik - IP hotspot

In the Hotspot dialog box, Click Hotspot Setup.
winbox mikrotik - hotspot setup

Then Mikrotik Hotspot Setup wizard, will be appear. This is easiest way to setup Hotspot interface in Mikrotik. IP address for Ethernet, DHCP Server, routing and firewall will be configured automatically. In the Mikrotik Hotspot Setup wizard, select ether2 as hotspot interface.  Then click Next.
winbox mikrotik - hotspot setup 2

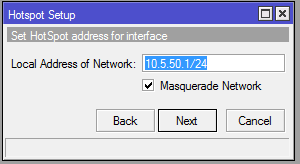
Set hotspot IP address.  Then click Next
winbox mikrotik - hotspot setup 3

Set Pool dhcp, then click Next
winbox mikrotik - hotspot setup 4

For SSL certificate, select none. Then Klik Next
winbox mikrotik - hotspot setup 5

Because we don’t have SMTP server, enter 0.0.0.0. Click Next
winbox mikrotik - hotspot setup 6

In the wizard Setup DNS, input IP DNS, then click Next
winbox mikrotik - hotspot setup 7

For DNS name, leave blank, then click Next.
winbox mikrotik - hotspot setup 8

Create users, and password,  then click Next
winbox mikrotik - hotspot setup 9

Done. Setup has completed successfully.
winbox mikrotik - hotspot setup complete

Back to the Mikrotik Hotspot dialog box. Click tab Server Profiles, then click twice to hsprof1 (look at example picture below). New open dialog box will appear about Hotspot Server Profile.
winbox mikrotik - hotspot server profiles

And then in tab Login, make sure in the section “Login By”, uncheck cookie, then click OK.
winbox mikrotik - hotspot server profiles settings

Until here, Mikrotik has been successfully configured as a hotspot. For testing of the client, create a voucher for the user / client. In the Mikrotik Hotspot dialog box, select tab Users – plus (+)
winbox mikrotik - hotspot users

In the new open dialog box, input  name & password. You can customize how the speed, duration of use, the mac address, and so on. It depends on your desire. Then click OK.
winbox mikrotik - hotspot users settings

In the computer client, browsing to any site, If the login page appears, it means mikrotik hotspot is working properly. Input username and password, that have been created. If everything is normal, the browser will be redirect to destination site.
mikrotik - hotspot page login


For security, don’t forget to make new password for user admin. Click system – password, fill new password in dialog box, and then click change.

mikrotik - change password
Disadvantages.
Generally, with a system like this, it can be regarded as a hotspot billing system, which can be commercialized. Of course there are a lot of drawbacks, such as :
1. Creation of user and password created manually.
2. There is no print facility.
3. Capacity for users is limited.
4. There's no price of package.
5. And so on, you can add it yourself.