There are many posts on how to configure Mikrotik as hotspot. But I am sure this is not the result of a cheat sheet. Even if some of section are the same, it was fate. Mikrotik is a friendly operation system, and is very easy to configured. Enough to know the concept of network, plus with a Winbox, then you will easily configure the Mikrotik, in accordance with your wishes. I configured wireless outdoor of mikrotik, as a hotspot. I forget the type of the mikrotik. It's been a long time. And now for the post on this blog, I configure the mikrotik hotspot again, but this time, the mikrotik is installed inside vmware.
Let’s begin.
Setup IP Address Ethernet.
In my case, the Mikrotik to connect to the internet, simply by setting IP address dhcp. Open winbox, Click IP – DHCP Client. In the open dialog box, click plus (+)
The new Open dialog box will be appear again, like below. Select ether1 interface, and check peer dns, ntp peer and the default route. Then click Ok.
Click new Terminal. Make sure Mikrotik connect to internet. Use command ping. Look at picture below.
Setting DNS
Click IP – DNS. In the open dialog box, click Settings. New open dialog will be appear. Input IP DNS in the box Servers, for example 8.8.8.8. and check Allow Remote Requests. Then click OK.
Setting NTP (Network Time Protocol)
Click System – NTP Client. Continue to check enable and select Unicast mode, and then input IP address for Primary NTP Server & Secondary NTP Server, as shown below. Then click OK.
Setting Mikrotik Hotspot
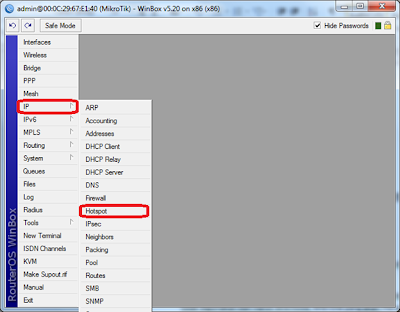
Continue to setting Hotspot. Click IP – Hotspot
In the Hotspot dialog box, Click Hotspot Setup.
Then Mikrotik Hotspot Setup wizard, will be appear. This is easiest way to setup Hotspot interface in Mikrotik. IP address for Ethernet, DHCP Server, routing and firewall will be configured automatically. In the Mikrotik Hotspot Setup wizard, select ether2 as hotspot interface. Then click Next.
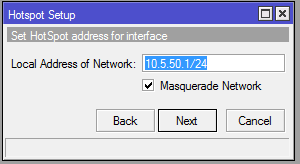
Set hotspot IP address. Then click Next
Set Pool dhcp, then click Next
For SSL certificate, select none. Then Klik Next
Because we don’t have SMTP server, enter 0.0.0.0. Click Next
In the wizard Setup DNS, input IP DNS, then click Next
For DNS name, leave blank, then click Next.
Create users, and password, then click Next
Done. Setup has completed successfully.
Back to the Mikrotik Hotspot dialog box. Click tab Server Profiles, then click twice to hsprof1 (look at example picture below). New open dialog box will appear about Hotspot Server Profile.
And then in tab Login, make sure in the section “Login By”, uncheck cookie, then click OK.
Until here, Mikrotik has been successfully configured as a hotspot. For testing of the client, create a voucher for the user / client. In the Mikrotik Hotspot dialog box, select tab Users – plus (+)
In the new open dialog box, input name & password. You can customize how the speed, duration of use, the mac address, and so on. It depends on your desire. Then click OK.
In the computer client, browsing to any site, If the login page appears, it means mikrotik hotspot is working properly. Input username and password, that have been created. If everything is normal, the browser will be redirect to destination site.
For security, don’t forget to make new password for user admin. Click system – password, fill new password in dialog box, and then click change.
Disadvantages.
Generally, with a system like this, it can be regarded as a hotspot billing system, which can be commercialized. Of course there are a lot of drawbacks, such as :
1. Creation of user and password created manually.
2. There is no print facility.
3. Capacity for users is limited.
4. There's no price of package.
5. And so on, you can add it yourself.


